Showing posts with label development. Show all posts

Tuesday, December 16, 2014

Happy 4th Analogversary! (3/3)

(...continuing from here and here)

Without a doubt, this year's highlight has been the completion of my dearest camera project.

Two years ago, as I was celebrating my second analogversary, I told you about what was to be my most special challenge for the following year: the quest for a camera made in 1912, exactly 100 years before our son was born. Romantic as I am, I wanted to find one that was still able to take photographs.

One year ago, on my third analogversary, I told you about one Vest Pocket Kodak that I found here in Vienna. This camera was a good candidate, since the first production run of the original (non-autographic) model took place from 1912 to 1914. It was in surprisingly good shape, especially for a near 100-year-old camera that has seen two world wars. The camera body, though, was badly deformed and the shutter did not fire at all. I did not really see a way to make it fit for taking pictures. For a couple of months I left the VPK project in standby.
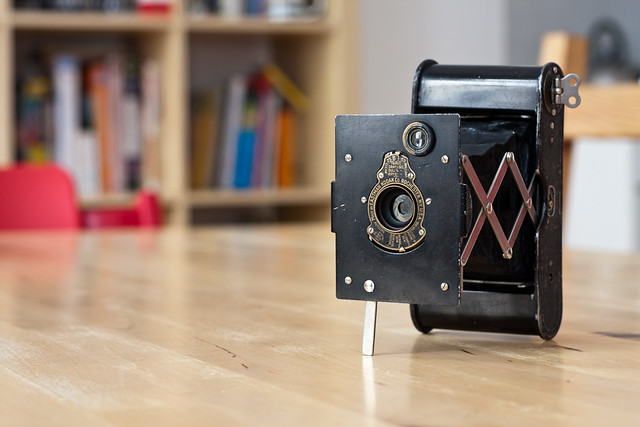
vest pocket kodak

Later this year I found another original Vest Pocket Kodak which turned out to be in much poorer condition, but had a working shutter and an intact camera body. The VPK project was alive again. After some hesitation I contacted Dr. White in the UK, whose website Collecting Vest Pocket Kodak Cameras is one of the best references that I could find about this camera model. I asked him for help in dating both of my VPK cameras. He was kind enough to recognize how meaningful this quest was to me, as he seems to share with me a passion for such endeavors, and promptly helped me with his ample knowledge. After some exciting e-mails he was able to confirm to me that, without a doubt, the first camera that I had, the one with the deformed body, came from the first production run in 1912. Square bellows, no "choke" to limit the maximum aperture and, crucially, no lettering on the front standard and no horizontal bar to help switch the waist level finder from the portrait to the landscape position were the features that pointed it to 1912. Again my deep gratitude to Dr. White for his help and for being such a key part in my 1912 camera quest.

I was very excited by this finding but still was not able to use the camera. I decided to build myself a working camera keeping as many parts of the 1912 one as I could. I exchanged the deformed camera body (in fact it is just the back: everything else, bellows, struts, front standard, shutter and lens completely detach in a block from the camera body) with the healthy one. Then I planned to mount the working shutter and lens onto the 1912 front standard but, in a touch of inspiration (with much trial and error and the minute bending of one crucially actuating lever), I managed to fix the 1912 shutter and to make its leaves open and close again. Which is fortunate, because both 1912 lens and shutter are in an almost pristine condition, contrary to the other one, which clearly shows its age. To sum up, I have now a working 1912 Vest Pocket Kodak with a back that, at the latest, was made in 1913 or 1914. This is not only the oldest but without a doubt the most special and meaningful camera that I own.
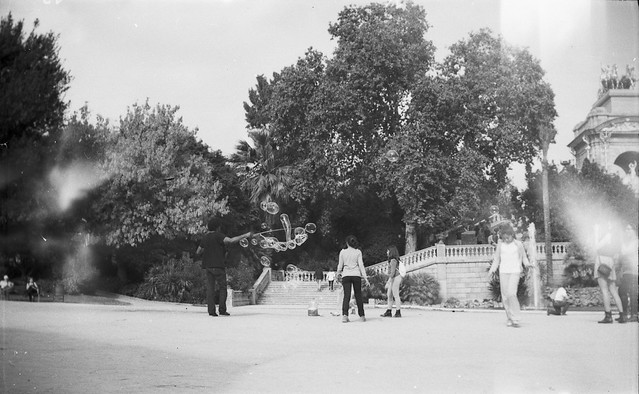
bubbles (43/52)
(Vest Pocket Kodak, Meniscus Achromat, Efke 100, ISO 100/21°)

It made me especially happy that the first pictures that I took with this camera were those of our son's second birthday, 102 years after the camera was built. After developing the film and looking at the pictures I was truly impressed by the performance of this very simple meniscus lens. The light leaks apparent in both pictures I am posting here are not the camera's fault, but mine: as I took out the exposed roll of film from the camera, the protective paper unrolled a bit and let a little light in. The camera bellows is perfectly light tight.
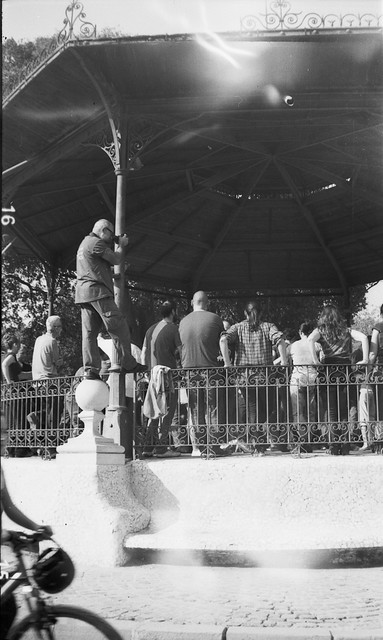
the photographer
(Vest Pocket Kodak, Meniscus Achromat, Efke 100, ISO 100/21°)

The 1912 Vest Pocket Kodak is not the most convenient camera to use, but still quite usable and, as its name promises, extremely easy to carry around. I used it again two weeks ago on 2nd Winter 127 Day (127 film was, in fact, introduced in 1912 specifically for this camera model!) and I am taking the 1912 VPK with me again this Christmas.

~ ~ ~ o ~ ~ ~

My plans for the next year are again collect less and shoot more. Well, not only shoot more but shoot better. I want to concentrate on using less cameras, my dearest ones, and try to take the most out of them. In this year I have the feeling I experimented too much: too long expired films, too extreme lighting conditions, too many poorly thought pictures shot hoping that they would come out fine. Most of them didn't. I wish to be able to take a little more time and consciousness in the picture taking act. I know I already have fine cameras and lenses, very capable of delivering quality. The weak link in the chain is now the photographer. I also want to concentrate on less films, the ones that worked best, and try to make the film choice a conscious picture taking decision at the same level as are framing, composition and depth of field.

I want to keep on doing my own repairs. Working on my cameras not only makes me strangely happy but also makes me know them a lot better. I (begin to) deeply understand what happens as I cock the shutter, as I advance film, as I change shutter speeds, inside many of my cameras. And this knowledge is gold for the times when things do not work properly. I really wish I manage to make the shutter in my Contax II work, since I have the gut feeling this camera could be the one to which I will always be returning.

I want to extend my developing skills beyond black and white. I am going to research the feasibility of developing color negative (C-41 process) and/or color slide (E-6 process) film at home, because I keep reading that it is not harder than black and white development. And, yes, I still find this caffenol development thing very exciting... :)

And, of course, I want to find more time to write about my photographic challenges here in my blog. I hope you'll keep on sharing this journey with me! :)

Monday, December 15, 2014

Happy 4th Analogversary! (2/3)

(...continuing from here)

One of my wishes for this fourth year was something in the lines of "collect less, shoot more". Well, the "collect less" part did not really come out very well, but I am happy to see that I did manage to shoot much more film than in the previous year. I shot 81 rolls/sheets of film in this year, which is almost as much as I shot in my first analogic year. Comparison with last year (32 rolls total) makes me quite happy. The cameras that I used the most have been the Kiev 4 in 35mm film (12 rolls) and a tie of the Bessa 6x9 and the Super Ikonta BX in 120 film (6 rolls each). This year I shot 5 rolls of 127 film, which is an all-time high. The Vest Pocket Kodak, one of the 127 cameras that I used, will be the main topic on my third and last analogversary post...

About the films that I used the most there are two old friends and a new kid on the block: in black and white I shot 4 rolls of Kodak Tri-X 400, most of them pushed even to EI 3200 (3 stops) which came out fine and contrasty, and in color slide again the winner was Fujichrome Velvia 50 with 6 rolls and 2 film sheets. In color negative I shot 7 rolls of an expired Porst Color-X 200, which I suspect is rebadged Kodak material, with a color rendition, especially in sunlight, that has grown on me along the year.

in the spotlight (20/52)
(Vitomatic IIa, Color-Skopar 50mm 1:2.8, Porst-Color-X 200, ISO 200/24°)

This year I shot a lot of sheet film using plate cameras: 6 sheets in 6.5x9 format (using both my Ideal 250/3 and my Bergheil 6.5x9) and 7 sheets in 9x12 format (with my Recomar 33). Again, there is great satisfaction in holding a huge 9x12 color slide sheet against the light and marvel at the level of detail that it can capture.

Another challenge that became a routine this year has been black and white film development. I developed 17 rolls/sheets of diverse brands of black and white film, all using the same film developer (Rodinal, in fact the oldest photographic product, still being produced after almost 125 years!) and mostly using stand development. There have been mixed results, the great part quite satisfying and some not so much. But I guess the not-that-happy ones were more about using very long expired film in poor lighting conditions than the development.

long toddler exposure
(Kiev 4, Jupiter-8M 50mm 1:2.0, Efke 25, ISO 25/15°, stand development 1.5 h in 1+100 rodinal)

I love the almost meditative mood one reaches on certain film development stages, especially in the final wash using the Ilford method: filling up the tank with water and performing slow inversions for 1, 2, 5, 10, 20 and 50 times each round, spilling the water and filling up the tank again each time between rounds. After that, the magical moment of opening the tank, and slowly unrolling the wet film from the reel to reveal the pictures that were latent until the chemicalthes did their job, is every time a personal highlight.

Another highlight this year has been in camera repairs. I started with my Rolleiflex Original 611, whose shutter needed attention. I managed to recover the sticky slow speeds and make the old rim set Compur shutter purr again happily even at 1 second. I, too, cleaned the optical path (inner side of the viewing lens, mirror and ground glass) as well as I could, which made the camera again quite usable. At last, I managed to clean and polish its leather, realizing that the brown spots that I thought were permanent did, in fact come out and left a shiny, beautiful camera that shouts quality from all its four corners. The Voigtländer Brillant V6 was a camera that I almost recovered to working condition from the trash can. I got it as a cheap addition to a lot (together with a Rolleicord V). Being a Voigtländer, even with a bakelite body, it is a well built and extremely well thought camera that responded very well to a little care. I fixed the film transport with film counter and automatic stop, and cleaned the waist-level finder and mirror to a crystal clear state I still can not believe. The Skopar 75mm 1:4.5 lens and the Compur shutter needed cleaning and service, too. All in all, I got lots of camera repair fun and a portable, usable camera that delivers a quality that is difficult to beat, all for what you would pay for a lunch in a standard restaurant.

The Ihagee Parvola 1350 needed, as usual, a little service in its Compur shutter. In this shutter I braved removing the slow speed escapament for the first time for properly cleaning it. It was my first time because on reinstallation one needs to adjust the shutter speeds again, because the position of this escapement determines the duration of the slow speeds. It was not easy, but at the end all speeds sound and look good enough for me. The Schneider Xenar 70mm 1:4.5 needed a little cleaning, too, and I lubricated the focusing helicals to make them run smoothly. Another first for me was adjusting a rangefinder: my Kodak Retina II needed a little lubrication and cleaning in the rangefinder, and after that the infinity setting needed to be adjusted again. I am still not quite sure if I got it right, I still have to check with critically focused shots, but it looks now clean enough to be used.

happy 4th analogversary!

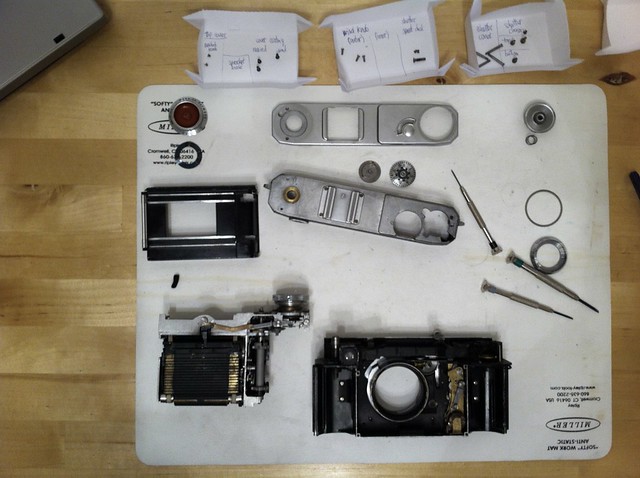
My biggest repair this year, though, is still a work in progress. The Zeiss Ikon Contax II, one of the best cameras ever made and one that I am really happy to own. As I got it, neither the self timer nor the shutter did work. The Contax has a metal curtain focal plane shutter, a quite different beast from the leaf shutters that I am now quite familiar with. I opened it carefully and disassembled to shutter block from the camera body. A little cleaning, a little help and I managed to make it run a couple of times, with a purring and whizzing sound from its multiple escapements that made me think for a moment that I was about to succeed. But then the bane of this camera model set off. The Achilles' heel of every prewar Contax, and in fact the only thing that ever fails with a Contax, are the silk shutter ribbons that link together the opening and closing curtains. The shutter design is such that the ribbons slide through tiny eyelets on the opening curtain that have enough friction to hold it up as the shutter is cocked but allow sliding through when the shutter is fired and both opening and closing curtains are reeled onto the lower drums. These ribbons needed to be replaced every ten or twenty years, cameras were guaranteed for around forty thousands shutter operations. A camera that was built in 1936-1937, like mine, and that probably has been sleeping for decades, has had plenty of time for these ribbons to become dry and fray. Two or three shutter operations in my hands after such a long time was definitely too much for the old silk ribbons, that broke and left me with a much more serious repair job to do. Because, of course, these ribbons can be replaced. I already got the replacement silk ribbons from Japan (it seems to be one of the few ribbon type and material that properly work on a prewar Contax) but I still did not find the courage to delve again into the job. The Contax II shutter remains my biggest camera repair challenge for the next year. And if I manage to fix the non-working self timer along the way, I will be twice as happy.

The last successful camera repair job this fourth year has been a Vest Pocket Kodak from 1912, my oldest and most significant camera so far. The whole story of the Vest Pocket Kodak, on my last analgoversary post, coming soon...

(to be continued...)


Tuesday, January 28, 2014

My first home b&w development!

Last Sunday I developed my first black&white film at home. And I must say that it was not as complicated and messy as I thought it would be. I develooped a medium format roll of Ilford FP4 Plus 125 that I shot with my Voigtländer Bessa 6x9 (with a 6x4.5 mask in place).

First I loaded the exposed film into the reel. This step needs to be done in complete darkness, so I used a changing bag. It was surprisingly quick, I was a little concerned it would be difficult, I read some "horror stories" about loading a medium format film into an AP reel, but it was not at all that hard. Then the reel went into the developing tank and the rest happened again in the light.

motorrad
(Bessa 6x9, Ilford FP4 Plus 125, ISO 125/22°)

Since the developer that I got is one of the modern formulations of Rodinal (having been patented in 1891 by Agfa, Rodinal is, in fact, the oldest photographic product in the world), I chose stand development, which basically consists of letting the developer slowly do its job without (almost) any interference for a long period of time. In my case, I inverted the tank for a minute each 2 seconds at the beginning (it should have been only 30 seconds), and for fifteen seconds after one hour. In total I let two hours pass before I applied stop bath and fixer.

double exposure
(Bessa 6x9, Ilford FP4 Plus 125, ISO 125/22°)

I am quite happy with the results. Well, the roll was not at all so well exposed (some overexposures, many out of focus shots, some accidental double exposures), but the development results are very promising, and I found the whole process quite easy and pretty much manageable for a lazy Sunday afternoon.

bin
(Bessa 6x9, Ilford FP4 Plus 125, ISO 125/22°)


Stay tuned, there will be more home development in the next months! :)

Wednesday, October 2, 2013

Darkroom workshop

Recently I attended a classic black&white darkroom technique workshop, where I learned all steps that must take place between taking the exposed film out of the camera and holding your picture in your hands on photo paper. On the first day we went out, exposed a roll of film and loaded it in the darkness into a developing spiral that went into a developing tank.

On the next day, the developed rolls were already waiting for us. We produced a contact print of all pictures taken and selected one to be enlarged. In this process we learned all about adjusting brightness and gradation and produced many copies of the selected picture, just to see how different the results can be by changing time of exposure or by using coloured filters.

This was my picture, taken with a Rolleiflex Old Standard 621 on medium format film.

dunkelkammer
(Rolleiflex Old Standard 621, Rollei Retro 400S, printed on Ilford Multigrade paper)

And this is another version, with much stronger gradation, that our teacher produced just as an experiment, as she rightly tought it would fit better with the mood of my picture.

dunkelkammer 1
(Rolleiflex Old Standard 621, Rollei Retro 400S, printed on Ilford Multigrade paper)

From the whole experience the step that astounded me the most, every single time I did it, was to immerse the exposed photo paper into the developing bath and see the picture emerge in the reddish dim light of the darkroom. The picture, that was first just an idea, then a temporary image on the viewfinder, finally appearing before the photographer's eyes, after having been latent on film and then revealed first as a negative image, exposed again with the enlarger and then being latent again, this time on photographic paper.

Manny thanks to Natascha Auenhammer from Zebra Labor for spreading her know-how and guide us through the reddish darkness of darkroom work.


Friday, July 8, 2011

Ilford XP2 Super 400 - developing b&w in color negative chemicals

_||_| (+1)
(Flexaret VI, Ilford XP2 Super 400, EI 400/27°)

Ilford XP2 Super 400 is a film for black&white prints that is developed using the C41 process, which is used for developing color negatives. I guess that's the reason why the negatives have a kind of subtle reddish tones.

Pictures taken on Ilford XP2 Super 400 in my flickr photostream

Saturday, March 19, 2011

Push processing

off-center bar
(Hapo 66-E, Ilford Delta 3200, EI 1600/33°)


One of the things photographers and enthusiasts have to worry about is ISO speed, which together with aperture and shutter speed, is one of the three variables that control exposure. In digital cameras, the ISO rating is adjustable from shot to shot, and determines how sensitive to light the sensor is. In a film camera, the ISO speed is a property of the film, not a camera setting. That's why it is properly called film speed.

If you have a digital camera and want to take a shot in low light, one of the possibilities you have is to choose a high ISO speed, in order to make you sensor more sensitive to light. This way, you might be able to achieve a shutter speed fast enough to shoot hand held. With a film camera, you choose a fast film. Since there ain't no such thing as a free lunch, though, high ISO comes at a price: noise with digital cameras, grain with film. It is a matter of taste and depends on the picture but, in general, grain does not bother me that much. Digital noise is another matter, though. I guess grain, especially on black and white film, has a kind of journalistic quality about it that makes it look familiar.

If your film is not fast enough, you always have the option of push processing it. This is easily understood with an example: I am shooting a film with a nominal ISO speed of, say, 100. But I expose it as if it were an ISO 400. This is called film rating, I rate my film to be ISO 400 (in fact, you cannot talk about ISO any more, but of exposure index, EI). I am getting a consistent underexposure on all my shots (they would be all too dark). But, since I know that, I let it develop (and here comes the push processing) for a longer time than a normal ISO 100 film would require.

This picture comes from the first film roll that I let push process. It is taken on Ilford Delta 3200, which despite the name is an ISO 1000 film, but I rated it at EI 1600. I let my photographic lab push process it, but I am not that happy with the results, which came out a little too dull. I guess I would be happier having the whole thing under control, or at least I would have much more fun...

I am beginning to consider facing the ultimate challenge: black and white film development at home.